Monday, August 23, 2010

Pork Kebab 2 With Proper Skewers

Same cooking as in "Pork Kebab on Big Green Egg" but using proper skewers which I finally have got from Amazon.

Same cooking as in "Pork Kebab on Big Green Egg" but using proper skewers which I finally have got from Amazon.


As expected the skewers were a little bit shorter than necessary for a medium size BGE

so I straightened out the handles.


The skewers came blunt and sharpening was required.


Cooking itself and the result were absolutely great.


A perfect Sunday evening.


Read more...

Sunday, August 8, 2010

Motorola i1 Phone - Some Accessories

I'd like to make a list of some accessories for Motorola i1 phone which I find useful.


i1 comes with 2 GB SD card. I decided to replace it with 8 GB:


They are available at many shops, I've got mine from Amazon:


If necessary i1 can be extended with SD memory card up to 32 GB.

Some protection for screen and body does not look superfluous to me. There are many products of this kind at Amazon:


I've bought the following two:

and

The first one is a very useful combination of Silicon Skin Cover, Car Charger, Home Wall Charger and USB cable.

Sticking the screen protecting film can be tricky. Any dust particle stuck in between the protector and the screen will create an ugly air bubble. So clean environment is very desirable to have it done well.

Read more...

Saturday, August 7, 2010

Goodbye Palm, Hello Android

Switching to one device which would have all the features I need on the way was a long time idea. Palm m515, I have, is a good gadget but missing cell phone; no WiFi or BlueTooth connection either. iPhone, been a very good product in general, has too closed policy: installation of third party applications needs a special hack, Development for iPhone requires approve and $99/year fee. So Android smart phones seem to be the most attractive option for me.

Since I don't call that much the most efficient way is a prepaid phone and such combination is available from Boost Mobile: Motorola i1 with Android + "Pay As You Go" plan. If necessary, "Monthly Unlimited" plan for $50/month takes off all the limitations.

I bought an i1 phone at BestBuy; activation at Boost Mobile was a breeze.


Here are some views of the back cover:

Closer look at the lock (left) side of the back cover:

Right side of the back cover:

I've been using it for a month already. The i1 phone works very well. Its construction seems reasonably robust. I have not experienced any problems with Boost Mobile service yet, connection is always reliable, no drops. i1 GPS receiver is sensitive enough to catch signals even at the basement, although it depends. Another pleasant surprise is that i1 can send GPS transmissions via USB to a computer (the connection appears as an additional COM port). Also i1 can work as an internet modem for a computer and the option is included to the Boost Mobile plans without additional fee. Verizon, as far as I know from my friends, wants additional $15/month to enable this feature.

Some words of concerns (well, nothing is perfect):

i1 has not a very powerful CPU and the phone can slow down if too many tasks are being executed in parallel. However by my experience keeping in task list only the programs which are really needed let i1 work pretty good.

i1 runs on Android version 1.5. Some people are suggesting that CPU is fast enough for newer versions of Android, hence the OS can be upgraded and hopefully it will, but Motorola does not reveal its plans. Limitation of the version can be faced on Android Market where some popular applications are not visible because they are not compatible with 1.5 version.

It is not a 3G or 4G phone - the same as iDEN cell network. I don't see a big problem for myself since public Wi-Fi is available in many places around.

Battery life is a common concern for this kind of phones. I would say that i1 have slightly longer battery life than more powerful Android phones. In average I recharge it every two days.
Read more...

Saturday, July 10, 2010

Pork Kebab on Big Green Egg

Big Green Egg is not a kebab kind oven, but if you like meat on skewers why not. Pork is very easy to deal with in this case.

Big Green Egg is not a kebab kind oven, but if you like meat on skewers why not. Pork is very easy to deal with in this case.

Cooking is straight forward. For this time I've got 4 pounds of boneless pork rib ends:

Wash it and cut into 2 inch cubes:

Peel a couple of onions and slice them:

Put cut meat into a pot or a bowl layer by layer interleaving with onion rings. Pour a marinade of your choice into the pot. Sometimes I use 1% vinegar solution, some other times nothing but seasoning. I heard that some people like to use a table wine or even a beer - one day I'll try that. For this time I've chosen a "garlic and herb" marinade from a shop. Stir up the meat gently to let marinade spread over the whole volume. Put the pot in a cold place for at least 30 minutes. Soak smoke chips.

Clean BGE, put fresh charcoal, start the fire. Kebab needs high temperature and fire under whole cooking area:

While BGE temperature is climbing up, thread cubes of meat interleaved by onion rings on skewers. From my experience meat pieces should be pressed tight one to another on a skewer, in this case it will be cooked well and stay juicy.

When temperature has reached 600F

drop smoke chips on the periphery of the burning charcoal, then place some skewers on the cooking grid or if skewers are long enough on the edges of the oven.

close the BGE cap and cook for 2 minutes or so, just to let one side of the meat catch the color, then rotate the skewers and repeat until all sides look good:

In my case I wanted it cooked to "well done" grade, so it needed some extra cooking time. In order to avoid over-frying I lifted skewers upper, away from burning fire,

and finished the cooking.

Served!

I have to say that this particular cooking was a little bit spontaneous and I used random skewers which I could quickly find around. The skewers had too narrow blades and that made difficult to rotate skewers along with meat. Meat simply did not follow rotation of the skewer keeping its center of gravity down. To avoid that some people use double skewers. I still prefer one blade variant and to make it working proper skewers should have blade width of about half an inch and an in-pressed groove or metal bending along the blade to increase rigidity of the skewer. I'm planning to get skewers like that for the future.

PS. Finally I've got appropriate skewers - check out "Pork Kebab 2 With Proper Skewers"


Read more...

Saturday, June 5, 2010

Eclipse Verilog / VHDL Editor Plug-in

veditor is a Verilog and VHDL editor for Eclipse SDE. It is an open source plug-in with very nice set of features.

First, some words about other VHDL and Verilog editors. They can be found integrated into FPGA IDE as QuartusII from Altera, for instance, or ISE from Xilinx and no doubts - they are very good. Each has a free version of IDE (Web Edition or WebPack). This is how QuartusII IDE looks like:

I like Notepad++ very much for editing a single HDL file. Notepad++ is convenient and powerful as a general editor. In addition to that it understands many different languages including VHDL and Verilog: colorizes keywords and marks logical blocks of the languages:

An obvious disadvantage is that it does not show relationship between other files in a project.

Here veditor can become helpful. It can treat a bunch of files as a project

with all interconnections between files. That significantly simplifies editing.

In Outline window it shows all elements of an open file as interface, signals and components. It really helps with finding and jumping right to the element you want to edit.

Also veditor detects and shows up syntax errors and warnings, for example, about declared but not used signals and components:

To install veditor, download the latest version of the plug-in (I've got net.sourceforge.veditor_0.7.1.jar), then copy the file into "eclipse\plugins\" directory. Verilog/VHDL editor will be available for using after restarting Eclipse.
Read more...

Sunday, May 30, 2010

Eclipse IDE - Add Python

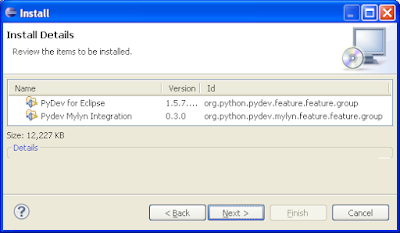
PyDev is a very good and popular Python IDE plug-in for Eclipse SDE. Adding it to Eclipse is straight forward: just follow "Quick Install" in the download page or detailed instructions from Installation section of PyDev manual.

I chose the installation via Update Manager:


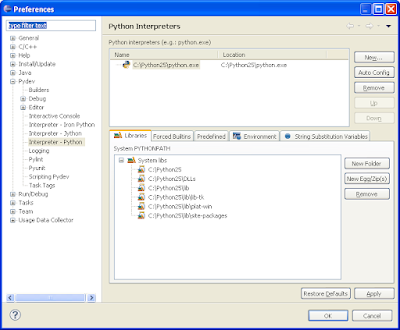
Start Eclipse and set up Python Interpreters in menu Windows/Preferences:


by clicking "Auto Config" or "New..." button.

For testing create a new Pydev project from menu File/New/Project:


Write any simple code and run:


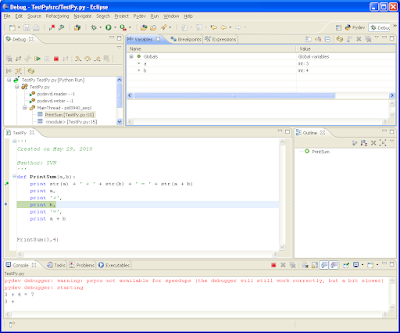
Python extension module Psyco can be installed in order to speed up debugging. It's a pity I could not make it work with Python 2.6 - it shows the warning that "psyco is not available...":


It works fine with Python 2.5:


Read more...

Sunday, May 23, 2010

Eclipse IDE - Starting Up

Eclipse SDE (Software Development Environment) is a great foundation for different languages IDEs (Integrated Development Environment). Eclipse functionality can be extended with plug-ins and there are plenty of them available for different purposes. Many of plug-ings are free of charge, some other are under commercial licensing. My personal interests lie in the field of programming with C/C++ and Python and corresponding plug-ins come for free.
Since Eclipse is written in Java, Java Runtime Environment (JRE) should be installed on the computer: get it from www.java.com. Installation of Eclipse is straight forward. It's easier to download the closest pre-configured package and unarchive it wherever you want. In my case it is "Eclipse IDE for C/C++ Developers". Eclipse Galileo Documentation (HTML Help Center) from Documentation page has all instructions for installation and tutorials to get started. For Windows I chose MinGW installation path:
  1. Download and run the MinGW setup program, MinGW-5.1.3.exe.

  2. Select download and install the MinGW base tools and the g++ compiler. You may select the Current or Candidate version of these tools. You may also install any of the other available compilers as well.
    Do not install the MinGW Make feature as the MSYS version of make from step 5 is a more complete implementation of make.


  3. The MinGW setup program currently does not install the gdb debugger. To install the debugger, download the file from the following location: gdb-6.6.tar.bz2

  4. Extract the contents of the file gdb-6.6.tar.bz2 to the same location where you installed MinGW.

  5. If you want to use Makefile projects, download and run the setup program from the following location: MSYS-1.0.10.exe. MSYS provides an implementation of Make and related command line tools. This is not required for other types of projects with the MinGW toolchain, which use CDT's internal build tools to perform the build.
It's simple to check how it runs by following "Creating a simple application" tutorial from Eclipse Galileo Documentation "C/C++ Development User Guide / Getting Started"
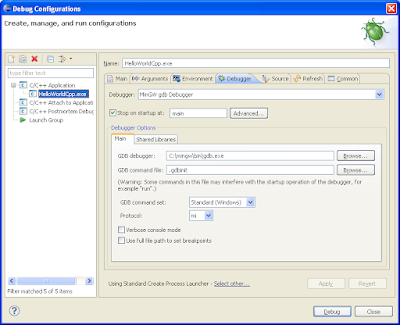
I had to put full path to dbg.exe debugger to make it working:


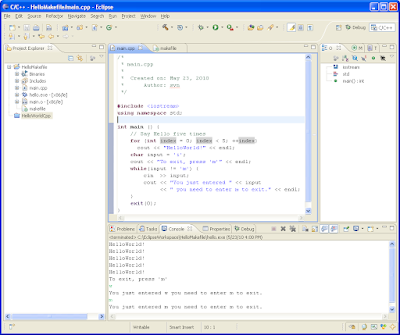
Follow the next "Creating a Makefile project" tutorial to check how Makefile approach works:


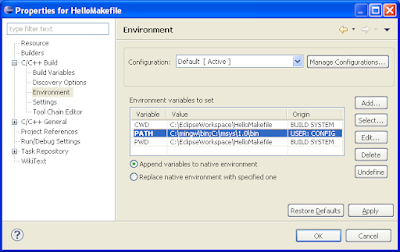
Here are some settings to get Makefile and Debug working:


Read more...